This is a riveting series:
- On the LPIC-1 Exam 102: Shells and Shell Scripting
- On the LPIC-1 Exam 102: User Interfaces and Desktops
- On the LPIC-1 Exam 102: Administrative Tasks
- On the LPIC-1 Exam 102: Essential System Services
- On the LPIC-1 Exam 102: Networking Fundamentals
- On the LPIC-1 Exam 102: Security
And, so is this one!
When studying for the Linux Professional Institute LPIC-1 certification, I took a bunch of notes when reading the docs and doing an online course. Note that this is not exhaustive, so do not depend on this article to get you prepared for the exam.
The menu items below are not in any order.
This roughly covers Topic 108: Essential System Services.
Caveat emptor.
- Exam Details
- Topic 108: Essential System Services
- Summary
- References
Exam Details
- Exam Objectives Version: 5.0
- Exam Code: 102-500
Topic 108: Essential System Services
Time
A system starts keeping time when it boots. The system clock is updated by the operating system, while the real-time clock, also known as the hardware clock, is integrated with the motherboard and keeps time even when the machine is powered off.
The system clock is synced with the real-time clock on boot, but the two clocks mainly run independently of each other.
Both clocks, however, are synchronized to network time via the Network Time Protocol (NTP).
The system clock is set to Coordinated Universal Time, and it is recommended that the system clock be set to
UTCrather than local time (which would beUTC+/- an offset and Daylight Savings).
date
The date tool will print or set the system date and time. It will print local time, which is an offset of Coordinated Universal Time (UTC).
There are many cool ways to print out the local time using different formats and time zones. In addition, you can print the date in the future or in the past.
$ date
Fri 03 Feb 2023 02:47:21 PM EST
In UTC:
$ date -u
Fri 03 Feb 2023 07:49:48 PM UTC
There are way too many formatting options to list here, you should see the man page. But, here are some:
-I,--iso-8601- formats in ISO 8601
-R,--rfc-email- formats in RFC 5322
--rfc-3339- formats in RFC 3339
Using formatting sequences, print the current hour and minute in military time:
$ date +%H:%M
15:12
Additionally, use --date to format a time that is not current:
$ date --date='@2564013011'
Sat 01 Apr 2051 09:50:11 PM EDT
In the future and the past!
$ date --date='TZ="America/Los_Angeles" 09:00 next Fri'
Fri 10 Feb 2023 12:00:00 PM EST
$ date --date='TZ="America/Los_Angeles" 09:00 last Fri'
Fri 27 Jan 2023 12:00:00 PM EST
Lastly, use the --debug option like a boss!
From the man page:
--debug
       annotate the parsed date, and warn about questionable usage to stderr
Have you heard of the Year 2038 problem? At its core, 32-bit systems are not going to be able to store time after 03:14:07 UTC on January 19, 2038. Attempting to store the time after that precise moment will cause an integer overflow.
hwclock
The hwclock utility allows one to view the time as maintained by the real-time clock. As an administration tool, it allows a privileged user to set both the real-time clock and the system clock and more.
$ sudo hwclock
2023-02-03 15:28:51.042561-05:00
The --verbose option gives you more information than you know what to do with:
$ sudo hwclock --verbose
hwclock from util-linux 2.36.1
System Time: 1675461223.537073
Trying to open: /dev/rtc0
Using the rtc interface to the clock.
Last drift adjustment done at 1672696998 seconds after 1969
Last calibration done at 1672696998 seconds after 1969
Hardware clock is on UTC time
Assuming hardware clock is kept in UTC time.
Waiting for clock tick...
...got clock tick
Time read from Hardware Clock: 2023/02/03 21:53:44
Hw clock time : 2023/02/03 21:53:44 = 1675461224 seconds since 1969
Time since last adjustment is 2764226 seconds
Calculated Hardware Clock drift is 0.000000 seconds
2023-02-03 16:53:43.523725-05:00
The Calculated Hardware Clock drift is the amount of time the system and real-time clocks are deviating from one another.
timedatectl
Use the timedatectl as yet another tool to display the system time and the hardware time (RTC time in the example below):
$ timedatectl
               Local time: Fri 2023-02-03 17:00:02 EST
           Universal time: Fri 2023-02-03 22:00:02 UTC
                 RTC time: Fri 2023-02-03 22:00:02
                Time zone: America/New_York (EST, -0500)
System clock synchronized: yes
              NTP service: active
          RTC in local TZ: no
It also lets you know if NTP is in use and has been used to synchronize the system and real-time clocks.
Use this command to set the time (and time zone) if NTP is unavailable or not installed. In this case, it is recommended to use this utility and not date or hwclock.
Also, timedatectl is the preferred command to use to set the timezone when no GUI exists.
From the man page:
set-time [TIME]
    Set the system clock to the specified time. This will also update the RTC time accordingly. The
    time may be specified in the format "2012-10-30 18:17:16".

set-timezone [TIMEZONE]
    Set the system time zone to the specified value. Available timezones can be listed with
    list-timezones. If the RTC is configured to be in the local time, this will also update the RTC
    time. This call will alter the /etc/localtime symlink. See localtime(5) for more information.
Time can be set independent of date using the format
HH:MM:SS.
List the time zones using timedatectl list-timezones. Remember, you can use the tzselect tool to select yours.
You can also use timedatectl set-ntp to enable NTP (or to disable, if you feel like living on the edge).
When setting the time zone without using timedatectl, simply create a symlink to the appropriate file in /usr/share/zoneinfo to the system /etc/localtime file:
$ ln -s /usr/share/zoneinfo/America/Toronto /etc/localtime
Also, you can use date or hwclock to set the date and time on a system that doesn’t use systemd for its system initialization.
Note that this is not recommended if you do use systemd (so, date and hwclock are considered legacy commands).
$ sudo date --set="11 Nov 2011 11:11:11"
$ sudo date +%Y%m%d -s "20111125"
$ sudo date +%T -s "13:11:00"
The
LPIC-1docs advise setting the hardware clock from the system clock after updating the date and time in the ways just described.$ sudo hwclock --systohc
For hwclock, you can do:
$ sudo hwclock --set --date "4/12/2019 11:15:19"
hwclock will report the date as local time, but note that it must be set in UTC.
The
LPIC-1docs advise setting the setting clock from the hardware clock after updating the date and time in the way just described.$ sudo hwclock --hctosys
Network Time Protocols
The best clocks to use for synchronizing are a reference or atomic clock. SNTP (Simple Network Time Protocal) and NTP (Network Time Protocol) are both networking protocols that allow for clock synchronization with these reference clocks, although the public are not allowed direct access to them.
NTP relies upon a hierarcy of machines:
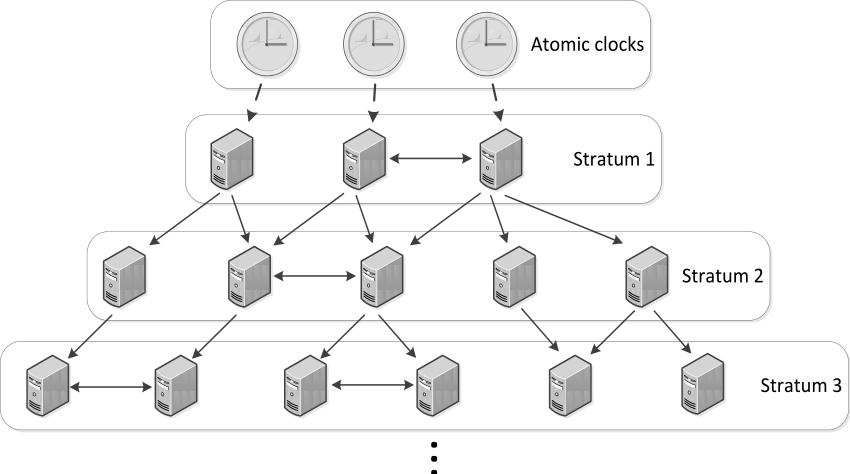
Reference clocks, also known as atomic clocks, are connected to the machines at the top. These are not accessible by the public, nor is the next level in the hierarchy, Stratum 1.
However, Stratum 1 machines are accessible by Stratum 2 machines, and this level of machines is accessible by the public (as are the lower levels).
It is recommended that any large NTP network only have a few access machines that access the Stratum 2+ servers, and then have those machines provide NTP services to all the rest of the network’s machines. This will reduce the overall load of the machines that provide NTP services to the entire world.
Here are some important terms that are thrown around like puppies when it comes to discussing and understanding NTP:
offsetstepslewinsane timedriftjitter
SNTP
If your system initialization service is systemd and it uses timedatectl, then by default it implements SNTP, not NTP. SNTP is a lighter-weight protocol, the main difference being that your system will not serve NTP to other machines.
SNTP is used only when the systemd-timesync daemon is active (if not installed, it’s just a quick sudo apt-get install systemd-timesync away). To check its status:
$ sudo systemctl status systemd-timesyncd
● systemd-timesyncd.service - Network Time Synchronization
     Loaded: loaded (/lib/systemd/system/systemd-timesyncd.service; enabled; vendor preset: enabled)
     Active: active (running) since Wed 2023-02-01 22:32:24 EST; 1 day 21h ago
       Docs: man:systemd-timesyncd.service(8)
   Main PID: 719 (systemd-timesyn)
     Status: "Initial synchronization to time server 104.131.155.175:123 (0.debian.pool.ntp.org)."
      Tasks: 2 (limit: 38126)
     Memory: 1.8M
        CPU: 385ms
     CGroup: /system.slice/systemd-timesyncd.service
             └─719 /lib/systemd/systemd-timesyncd

Feb 01 23:56:05 kilgore-trout systemd-timesyncd[719]: Initial synchronization to time server 208.67.72.50:123 (>
Feb 02 18:10:21 kilgore-trout systemd-timesyncd[719]: Initial synchronization to time server 23.131.160.7:123 (>
Feb 02 22:18:00 kilgore-trout systemd-timesyncd[719]: Initial synchronization to time server 65.100.46.164:123
...
Once the service is started, you can then verify that the time has been synced:
$ timedatectl
               Local time: Tue 2023-08-29 22:40:46 EDT
           Universal time: Wed 2023-08-30 02:40:46 UTC
                 RTC time: Wed 2023-08-30 02:40:46
                Time zone: America/New_York (EDT, -0400)
System clock synchronized: yes
              NTP service: active
          RTC in local TZ: no
Use timedatectl to check the SNTP synchronization status:
$ timedatectl show-timesync --all
LinkNTPServers=
SystemNTPServers=
FallbackNTPServers=0.debian.pool.ntp.org 1.debian.pool.ntp.org 2.debian.pool.ntp.org 3.debian.pool.ntp.org
ServerName=0.debian.pool.ntp.org
ServerAddress=104.131.155.175
RootDistanceMaxUSec=5s
PollIntervalMinUSec=32s
PollIntervalMaxUSec=34min 8s
PollIntervalUSec=8min 32s
NTPMessage={ Leap=0, Version=4, Mode=4, Stratum=2, Precision=-30, RootDelay=4.165ms, RootDispersion=3.982ms, Reference=AB400749, OriginateTimestamp=Fri 2023-02-03 19:41:30 EST, ReceiveTimestamp=Fri 2023-02-03 19:41:30 EST, TransmitTimestamp=Fri 2023-02-03 19:41:30 EST, DestinationTimestamp=Fri 2023-02-03 19:41:30 EST, Ignored=no PacketCount=115, Jitter=126.318ms }
Frequency=-3812749
If you need to synchronize all the clients in your network, then SNTP will not be enough. Let’s now look at NTP.
NTP
$ sudo apt-get install ntp
$ sudo systemctl enable ntpd
$ sudo systemctl start ntpd
NTP queries use port 123.
The config file is located at /etc/ntp.conf.
The NTP servers are configured in a section that looks like:
server 0.debian.pool.ntp.org iburst
server 1.debian.pool.ntp.org iburst
server 2.debian.pool.ntp.org iburst
server 3.debian.pool.ntp.org iburst
The servers can be IP addresses or URLs if DNS is configured.
Here, it looks like a server will be chosen from a pool of low-stratum servers.
If the difference between system time and network time (NTP) is more than 17 minutes (that is, the offset is greater than 17 minutes), then this is considered insane time and can only be fixed by manual interventions.
First, stop the ntpd service:
$ sudo systemctl stop ntpd
And then perform an initial one-time synchronization using ntpdate:
$ sudo ntpdate pool.ntp.org
Lastly, you can use the ntpq utility to monitor the status of NTP:
$ ntpq -p
     remote           refid      st t when poll reach   delay   offset  jitter
==============================================================================
 0.debian.pool.n .POOL.          16 p    -   64    0    0.000   +0.000   0.000
 1.debian.pool.n .POOL.          16 p    -   64    0    0.000   +0.000   0.000
 2.debian.pool.n .POOL.          16 p    -   64    0    0.000   +0.000   0.000
 3.debian.pool.n .POOL.          16 p    -   64    0    0.000   +0.000   0.000
+us-west-1.clear 173.11.101.155   2 u   57   64  377   78.195   +0.003   0.898
+time.lmtlabs.co 47.187.174.51    2 u   66   64  377   21.071   +0.873   1.261
+time.cloudflare 10.94.8.6        3 u   62   64  375   14.819   +0.157   1.142
+44.190.40.123   66.220.9.122     2 u  195   64  374   75.673   -0.393   1.524
+216.31.16.12 (n 172.18.56.13     2 u   63   64  375   30.829   -0.669   1.728
-ntp.raptorengin 192.168.60.11    2 u   53   64  377   36.498   -0.144   1.570
+108.61.73.244   129.6.15.27      2 u   68   64  377   19.095   -0.430   1.418
-owners.kjsl.com 66.162.37.244    2 u   66   64  377   74.391   -2.311   1.345
*068-112-004-226 128.252.19.1     2 u   64   64  375   36.988   +0.431   2.064
+linode1.ernest- 198.72.72.10     3 u    3   64  373   33.016   -1.364  20.379
| Column | Description |
|---|---|
remote |
hostname of the NTP provider |
refid |
reference ID of the NTP provider |
st |
stratum of the provider |
when |
number of seconds since the last query |
poll |
number of seconds between queries |
reach |
status ID to indicate whether a server was reached, successful connections will increase this number by 1 |
delay |
time in ms between query and response by the server |
offset |
time in ms between system time and NTP time |
jitter |
offset in ms between system time and NTP in the last query |
ntpqinteractive mode is initiated when it is run without any arguments:$ ntpq ntpq> ? ntpq commands: :config drefid mreadlist readvar addvars exit mreadvar reslist apeers help mrl rl associations host mrulist rmvars authenticate hostnames mrv rv authinfo ifstats ntpversion saveconfig cl iostats opeers showvars clearvars kerninfo passociations sysinfo clocklist keyid passwd sysstats clockvar keytype peers timeout config-from-file lassociations poll timerstats cooked lopeers pstats version cv lpassociations quit writelist debug lpeers raw writevar delay monstats readlist ntpq>
chrony
$ sudo apt-get install chrony
This install a couple of binaries:
chronyd- thechronydaemonchronyc- thechronyCLI
$ chronyc tracking
Reference ID    : D81F100C (ntp.svcs.ord07.cymru.com)
Stratum         : 3
Ref time (UTC)  : Thu Aug 31 00:04:59 2023
System time     : 0.000415254 seconds slow of NTP time
Last offset     : -0.000014862 seconds
RMS offset      : 0.000745508 seconds
Frequency       : 13.100 ppm slow
Residual freq   : +0.065 ppm
Skew            : 2.823 ppm
Root delay      : 0.031643603 seconds
Root dispersion : 0.003978447 seconds
Update interval : 65.3 seconds
Leap status     : Normal
Get detailed information about the last time NTP was synchronized:
$ sudo chronyc ntpdata
List the NTP servers that are used to synchronize the time:
$ chronyc sources
MS Name/IP address         Stratum Poll Reach LastRx Last sample
===============================================================================
^+ triton.ellipse.net            2   6   377    50  +2922us[+2990us] +/-   42ms
^* ntp.svcs.ord07.cymru.com      2   6   377    49  -1289us[-1220us] +/-   27ms
^+ sensei.ruselabs.com           2   6   377    51   -286us[ -217us] +/-   44ms
^+ hc-007-ntp1.weber.edu         1   6   377    49   +186us[ +186us] +/-   34ms
If no sources are listed, you can enter them in the chrony configuration file: /etc/chrony/chrony.conf (this is the location on Debian).
rsyslog
Logs are generated from the moment that the kernel is loaded into memory onwards. Logging has traditionally been handled by syslog, syslog-ng (New Generation) and rsyslog (rocket-fast syslog). The exam seems to focus solely on rsyslog, and so we will, too.
One of the advantages of rsyslog over its predecessors is its Reliable Event Logging Protocol (RELP) support. It is often used in environments which cannot tolerate message loss, such as the financial industry.
rsyslog collects messages from services and programs and stores them in text files, usually under /var/log/. Some applications, such as web servers like nginx and apache, take care of their own logs, but you’ll still find them in the same location (/var/log/).
The kernel writes its messages to an in-memory ring buffer.
rsyslog has a client-server model. In most situations, both the client and server are on the same machine (such as the laptop on which I’m now typing), but often the logs are sent to a centralized remote server (or perhaps servers) for aggregation. The messages themselves are in a particular format, which we’ll see shortly.
The
rsyslogddaemon works together withklogd, which manages kernel messages.
Log Types
Logs are variable data, so they’ll be found in /var under /var/log/. They can be roughly classified into system logs and service or program logs.
System Logs
We’ll first look at some system logs:
/var/log/auth.log- activities related to authentication processes: logged users,
sudoinformation, cron jobs, failed login attempts, etc.
- activities related to authentication processes: logged users,
/var/log/syslog- a centralized file for practically all of the logs captured by
rsyslogd
- a centralized file for practically all of the logs captured by
/var/log/debug- debug information from programs
/var/log/kern.log- kernel messages
/var/log/messages- informative messages which are not related to the kernel but to other services
- also, the default remote client log destination in a centralized log server implementation
/var/log/daemon.log- information related to daemons or services running in the background
/var/log/mail.log- information related to the email server, e.g.
postfix
- information related to the email server, e.g.
/var/log/Xorg.0.log- information related to the graphics card
/var/run/utmp,/var/log/wtmp- successful logins
/var/log/btmp- failed login attempts, e.g.
sshbrute force attacks
- failed login attempts, e.g.
/var/log/faillog- failed authentication attempts
/var/log/lastlog- date and time of recent user logins
Service Logs
Next, let’s turn our attention to service or program logs:
/var/log/cups/access_logerror_logpage_log
/var/log/{apache2,httpd}/access_logerror_logother_vhosts_access.log
/var/log/mysqlerror_logmysql.logmysql-slow.log
/var/log/samba/log.nmbdlog.smbd
/var/log/dpkg.log- containing information related to dpkg packages
- only exists for Debian distributions
Reading Logs
Tools
rsyslogs are textual, so you can use the less and more pagers like you would for any text file. For logs that have been compressed with the gzip utility, you can use zless and zmore.
By default,
logrotatewill usegzipfor compression.
In addition, you can use your old friends head, tail (often with -f or --follow) and grep.
Format
- timestamp
- hostname from which the message originated
- name of program/service that generated the message
- the PID of the program that generated the message
- description of the action that took place
For example:
$ sudo head -1 /var/log/daemon.log
Mar  4 01:22:54 kilgore-trout systemd[1]: rsyslog.service: Sent signal SIGHUP to main process 904 (rsyslogd) on client request.
The format and the respective values of the fields are:
- timestamp
Mar 4 01:22:54
- hostname from which the message originated
kilgore-trout
- name of program/service that generated the message
systemd
- the PID of the program that generated the message
[1]
- description of the action that took place
rsyslog.service: Sent signal SIGHUP to main process 904 (rsyslogd) on client request.
Most of the logs are textual, but some are binary. Here are some examples and the tools to use to view them.
-
/var/log/wtmp -
/var/log/btmp -
/var/log/lastlog
There are also graphical tools like
gnome-logsandKSystemLog.
Process of Writing Logs
-
Applications, services and the kernel write messages in special files (sockets and memory buffers), e.g.
/dev/logor/dev/kmsg.$ readlink -f /dev/log /run/systemd/journal/dev-log $ file $(!!) file $(readlink -f /dev/log) /run/systemd/journal/dev-log: socket -
rsyslogdgets the information from the sockets or memory buffers. -
depending on the rules found in
/etc/rsyslog.confand/or the files in/etc/ryslog.d/,rsyslogdmoves the information to the corresponding log file (typically found in/var/log)
You can list all sockets on the system through systemd by issuing the following command:
$ systemctl list-sockets --all
rsyslog.conf
The configuration log for rsyslogd can be found in /etc/rsyslog.conf. It (usually) consists of three sections:
-
MODULES- includes module support for logging, message capability and
UDPandTCPlog reception:################# #### MODULES #### ################# module(load="imuxsock") # provides support for local system logging module(load="imklog") # provides kernel logging support #module(load="immark") # provides --MARK-- message capability # provides UDP syslog reception #module(load="imudp") #input(type="imudp" port="514") # provides TCP syslog reception #module(load="imtcp") #input(type="imtcp" port="514")
- includes module support for logging, message capability and
-
GLOBAL DIRECTIVES- configure a number of things such as logs and log directory permissions
###########################
#### GLOBAL DIRECTIVES ####
###########################

#
# Use traditional timestamp format.
# To enable high precision timestamps, comment out the following line.
#
$ActionFileDefaultTemplate RSYSLOG_TraditionalFileFormat

#
# Set the default permissions for all log files.
#
$FileOwner root
$FileGroup adm
$FileCreateMode 0640
$DirCreateMode 0755
$Umask 0022

#
# Where to place spool and state files
#
$WorkDirectory /var/spool/rsyslog

#
# Include all config files in /etc/rsyslog.d/
#
$IncludeConfig /etc/rsyslog.d/*.conf
- configure a number of things such as logs and log directory permissions
-
RULES-
this section tells
rsysloghow to filter logging messages through rules and ultimately where to send them -
this is enabled through the use of
facilitiesandpriorities -
each log message is given a
facilitynumber and keyword that are associated with the Linux internal subsystem that produces the message:Number Keyword Description 0 kernLinux kernel messages 1 userUser level messages 3 daemonSystem daemons 4 auth,authprivSecurity and Authorization messages 5 syslogsyslogdmessages6 lprLine printer subsystem 7 newsNetwork news subsystem 8 uucpUUCP(Unix-to-Unix Copy Protocol) subsystem9 cronClock daemon 10 auth,authprivSecurity and Authorization messages 11 ftpFTP(File Transfer Protocol) daemon12 ntpNTP(Network Time Protocol) daemon13 securityLog audit 14 consoleLog alert 15 cronClock daemon 16-23 local0-local7Local use 0-7 -
each log message is also assigned a
prioritylevel:Code Severity Keyword Description 0 Emergency emerg,panicSystem is unusable 1 Alert alertAction must be taken immediately 2 Critical critCritical conditions 3 Error err,errorError conditions 4 Warning warn,warningWarning conditions 5 Notice noticeNormal but significant condition 6 Informational infoInformational messages 7 Debug debugDebug-level messages ############### #### RULES #### ############### # # First some standard log files. Log by facility. # auth,authpriv.* /var/log/auth.log *.*;auth,authpriv.none -/var/log/syslog #cron.* /var/log/cron.log daemon.* -/var/log/daemon.log kern.* -/var/log/kern.log lpr.* -/var/log/lpr.log mail.* -/var/log/mail.log user.* -/var/log/user.log # # Logging for the mail system. Split it up so that # it is easy to write scripts to parse these files. # mail.info -/var/log/mail.info mail.warn -/var/log/mail.warn mail.err /var/log/mail.err # # Some "catch-all" log files. # *.=debug;\ auth,authpriv.none;\ mail.none -/var/log/debug *.=info;*.=notice;*.=warn;\ auth,authpriv.none;\ cron,daemon.none;\ mail.none -/var/log/messages # # Emergencies are sent to everybody logged in. # *.emerg :omusrmsg:*
-
So, what’s the rule format?
<facility>.<priority> <action>
Let’s break down some examples like it’s 1984.
Examples
auth,authpriv.* /var/log/auth.log
Regardless of the priority (like in globbing, the asterisk matches everything), all messages from the auth and authpriv facilities are sent to /var/log/auth.log.
*.*;auth,authpriv.none -/var/log/syslog
All messages, irrespective of their priority (*), from all facilities (*) (discarding those from auth or authpriv because of the .none suffix), will be written to /var/log/syslog.
The hyphen
-before the path prevents excessive disk writes.
Note the semicolon ; to split the selector and the comma , to concatenate two facilities in the same rule (auth, authpriv).
mail.err /var/log/mail.err
Messages from the mail facility with a priority level of error or higher (critical, alert or emergency) will be sent to /var/log/mail.err.
*.=debug;\
    auth,authpriv.none;\
    mail.none		-/var/log/debug
Messages from all facilities with the debug priority and no other (=) will be written to /var/log/debug, excluding any messages coming from the auth, authpriv, news and mail facilities (note the syntax: ;\).
logger
There is a logger utility that will write directly to the /var/log/syslog file (or to /var/log/messages when logging to a centralized remote log server).
$ logger "what's up broseph"
$ sudo tail -1 /var/log/syslog
Mar  5 01:56:55 kilgore-trout btoll: what's up broseph
rsyslog Remote Server
Let’s check out how we can send log messages to a remote rsyslogd server.
- ensure that the
rsyslogdserver is running on the remote machine - create a file that loads the module and starts the
tcpserver on port 514 (for example,SUSEships with a file for this,/etc/rsyslog.d/remote.conf) - restart the
rsyslogdservicesudo systemctl restart rsyslog
- open port 514 in the firewall
- by creating a
templateand adding afilter condition, the logs can be written to a particular location on the remote server (instead of defaulting to/var/log/messages) and be filtered byIPaddress- for example, the following can be added either to
/etc/rsyslog.confor/etc/rsyslog.d/remote.confon the remote server:$template RemoteLogs,"/var/log/remotehosts/%HOSTNAME%/%$NOW%.%syslogseverity-text%.log" if $FROMHOST-IP=='192.168.1.4' then ?RemoteLogs & stop
- for example, the following can be added either to
- on the client, add this to its
/etc/rsyslog.confand afterwards restart thersyslogservice:*.* @@192.168.1.6:514(can also use name resolution if it’s been configured)- the
IPaddress is that of the remotersyslogserver - the
& stoptells the daemon not to also write the logs to the host’s/var/log/messageslog file
Log Rotation
The system utility in charge of rotating the logs is logrotate. It generally does the following things:
- renaming log files as they age
- archiving and/or compressing them
- possibly emailing them to the system administrator
- deleting them as they outlive their usefulness
There are various conventions for (re)naming the archived log files, but a common practice is simply to append an integer to the file name which indicates their age in weeks.
For example:
$ ls /var/log/messages*
/var/log/messages    /var/log/messages.2.gz  /var/log/messages.4.gz
/var/log/messages.1  /var/log/messages.3.gz
For the next rotation, the oldest logfile will be deleted (/var/log/messages.4.gz), and the others will be incremented. All but the current log file and /var/log/messages.1 will be gzip compressed.
logrotate is run as an automated process or cron job daily through the script /etc/cron.daily/logrotate and reads the configuration file /etc/logrotate.conf.
Looking at the lograte.conf config file, we can see it’s fairly self-explanatory:
$ cat /etc/logrotate.conf
# see "man logrotate" for details

# global options do not affect preceding include directives

# rotate log files weekly
weekly

# keep 4 weeks worth of backlogs
rotate 4

# create new (empty) log files after rotating old ones
create

# use date as a suffix of the rotated file
#dateext

# uncomment this if you want your log files compressed
#compress

# packages drop log rotation information into this directory
include /etc/logrotate.d

# system-specific logs may also be configured here.
Configurations for specific packages can be installed in /etc/logrotate.d/. Here is an example:
$ cat /etc/logrotate.d/ufw
/var/log/ufw.log
{
        rotate 4
        weekly
        missingok
        notifempty
        compress
        delaycompress
        sharedscripts
        postrotate
                invoke-rc.d rsyslog rotate >/dev/null 2>&1 || true
        endscript
}
Kernel Ring Buffer
Since the kernel generates several messages before rsyslogd becomes available on boot, a mechanism to register those messages becomes necessary. This is the kernel ring buffer. It is a fixed-size data structure and as it grows with new messages, the oldest will disappear.
The dmesg utility prints the contents of the kernel ring buffer. It can also be viewed using either journalctl --dmesg or journalctl -k.
systemd-journald
Why use systemd for logging?
- ease of configuration: unit files as opposed to
SysVInit script - versatile management: apart from daemons and processes, it also manages devices, sockets and mount points
- backward compatibility with both
SysVInit andUpstart - parallel loading during boot-up: services are loaded in parallel as opposed to
SysvInit loading them sequentially - it features a logging service called the journal that presents the following advantages:
- it centralizes all logs in one place
- it does not require log rotation
- logs can be disabled, loaded in
RAMor made persistent
systemd operates on units, whose behaviors are defined in text files in /lib/systemd/system/. These unit types can be:
servicemountautomountswaptimerdevicesocketpathtimersnapshotslicescopetarget
A target, on the other hand, is an aggregation of units that are conceptually and functionally like the runlevels of old.
systemd-journald is the logging service for systemd, and its raison d'être is that of creating and maintaining a structured and indexed journal, which are kept in binary files.
It gets its message logs from a number of sources:
- kernel messages
- simple and structured system messages
- standard output and standard error of services
- audit records from the kernel audit subsystem
Its configuration file lives in /etc/systemd/journald.conf.
You can check its status like any other systemd service:
$ systemctl status systemd-journald
journalctl
journalctl is the utility that is used to interact with the daemon and get logging information.
Here are some of its most useful options:
| Option | Description |
|---|---|
-D, --directory |
Specify a directory path to search for journal files instead of the default runtime and system locations. |
-m, --merge |
Merges entries from all available journals under /var/log/journal, including remote ones. |
--file |
Show the entries in a specific file. |
--root |
A directory path where journalctl will search for journal files. |
-r, --reverse |
Print journal messages in reverse order. |
-f, --follow |
Behaves like tail -f. |
-e, --pager-end |
Jump to the end of the journal. |
-n, --lines |
Prints n number of most-recent messages (defaults to ten). |
-k, --dmesg |
Equivalent to dmesg. |
--list-boots |
Lists all available boot logs. |
-b, --boot |
Shows all messages from the current boot or n boot. |
-p, --priority |
Filter by priority (see above). |
-S, --since, -U, --until |
Filter by time interval (see systemd.time). |
[/path/to/binary] |
See messages generated by /path/to/binary. |
-u, --unit |
Filter messages by unit. |
PRIORITY |
Filter by syslog priority value as a decimal string (see above). |
SYSLOG_FACILITY |
Filter by syslog facility code number as a decimal string (see above). |
_PID |
Filter by PID. |
_BOOT_ID |
Filter by BOOT_ID. |
_TRANSPORT |
Filter by TRANSPORT. |
Also, fields can be combined:
$ sudo journalctl --list-boots
-8 bae9348f0a3445c89b3c63ffb0603ca5 Sat 2023-08-26 18:23:31 EDT—Sat 2023-08-26 18:31:34 EDT
-7 f168934625384001948d504123c993a0 Sat 2023-08-26 18:32:07 EDT—Sat 2023-08-26 18:50:39 EDT
-6 303117c5169f46da9a86853f24ab2e9c Sat 2023-08-26 18:51:12 EDT—Sat 2023-08-26 18:54:28 EDT
-5 f49a2682ccc34dcaa281b8cc0dff6b62 Sat 2023-08-26 18:55:03 EDT—Sat 2023-08-26 19:59:46 EDT
-4 d7059a610af64cec8645c47d587bbb7b Sat 2023-08-26 20:00:58 EDT—Sat 2023-08-26 22:28:11 EDT
-3 112fe341ed0c469e9511e737d367a3b8 Sat 2023-08-26 22:30:13 EDT—Sun 2023-08-27 00:50:15 EDT
-2 06e54073cf98424aab6d49e3ebe3e1f5 Sun 2023-08-27 00:50:46 EDT—Sun 2023-08-27 18:43:33 EDT
-1 d2f1dac541b8475aaf758ab5bed2a600 Sun 2023-08-27 18:44:06 EDT—Mon 2023-08-28 00:24:02 EDT
 0 8e2a6d3cee22448a978bb458760c4fc2 Mon 2023-08-28 00:25:14 EDT—Thu 2023-08-31 21:25:01 EDT
$ sudo journalctl PRIORITY=4 SYSLOG_FACILITY=0
Using the + operator behaves like a logical OR:
$ sudo journalctl PRIORITY=3 + SYSLOG_FACILITY=0
Providing two values for the same field will find all matching entries for either value:
$ sudo journalctl PRIORITY=1 PRIORITY=3
See
systemd.journal-fieldsfor more information.
systemd-cat
systemd-cat is the logger of systemd, but more powerful. It not only allows for sending stdin, stdout and stderr to the journal, but it can be used in pipelines or capturing a program’s output in the journal.
Let’s look at some examples:
$ systemd-cat
This line goes into the journal.
^C
systemd-catwith no arguments will write everything fromstdinuntilCtrl-Cis entered.
$ echo "And so does this line." | systemd-cat
$ systemd-cat echo "And so does this line too."
$ systemd-cat -p emerg echo "This is not a real emergency."
They can then be viewed in the journal:
$ journalctl -n 4
Journal Storage
There are three options when it comes to keeping journaling:
- turn it off (can still be redirected to
stdoutor other facilities) - written to volatile
RAMin/run/log/journaland is thrown away upon reboot - persisted to disk in the
/var/log/journaldirectory
What is the default behavior?
- if
/var/log/journaldoesn’t exist, save logs in/run/log/journal(will be volatile) - the name of the directory (in either location) is the machine ID (
/etc/machine-id)
If you want to persist logs and /var/log/journal doesn’t exist, create it and then restart the journal daemon. This “tells” the systemd-journald service to persist the logs by writing them to /var/log/journal.
The LPIC-1 docs only focus on one of the configuration fields in /etc/systemd/journald.conf: Storage=. Let’s look at its possible values and what they mean:
| Storage= | Description |
|---|---|
volatile |
Log data will be stored exclusively in memory in /run/log/journal. |
persistent |
Log data will be stored on disk in /var/log/journal with the fallback to RAM during early boot stages and if the disk is not writable (both dirs are created, if needed). |
auto |
Similar to persistent, but the directory /var/log/journal is not created, if needed (this is the default). |
none |
All log data is discarded. Forwarding to other targets such as the console, the kernel log buffer, or a syslog socket are still possible, though. |
Journal files in either location have the
.journalextension.However, if they are found to be corrupted or the daemon is stopped in an unclean fashion, they will be renamed by appending
~(e.g.system.journal~) to the journal name, and the daemon will then start writing to a new, clean file.
Deleting Old Journals
To see how much space the journals take (both archived and active), run:
$ sudo journalctl --disk-usage
Note that running as a privileged user will show the messages of not only all the users but those generated by the system, while running the command as a user will only show that user’s journal space.
systemd logs default to a maximum of 10% of the size of the filesystem where they are stored. Once that threshold is reached, old logs will start to be deleted.
Total size and other behaviors can of course be configured. Here are some of the common ones:
SystemMaxUse=,RuntimeMaxUse=SystemKeepFree=,RuntimeKeepFree=SystemMaxFileSize=,RuntimeMaxFileSize=SystemMaxFiles=,RuntimeMaxFiles=MaxRetentionSec=,MaxFileSec=
In addition, you can manually clean archived journal files at any time with any of the following three options:
--vacuum-time=--vacuum-size=--vacuum-files=
Vacuuming only removes archived journal files. If you want to get rid of everything (including active journal files), you need to use a signal (SIGUSR2) that requests immediate rotation of the journal files with the --rotate option.
Other important signals can be invoked with the following options:
--flush (SIGUSR1)--sync (SIGRTMIN+1)
Note to check the internal consistency of the journal file, use
journalctlwith the--verifyoption.
Retrieving Journal Data
Let’s say that you are trying to access journal files on a faulty machine through a live CD. Once the hard drive on the faulty machine is mounted, you can point journaltctl to the journal files like this:
# journalctl -D /media/btoll/faulty.system/var/log/journal/
Here are some useful options:
| Option | Description |
|---|---|
-D, --directory |
Takes a directory path as argument. If specified, journalctl will operate on the specified journal directory DIR instead of the default runtime and system journal paths. |
--file |
Takes a file glob as an argument. If specified, journalctl will operate on the specified journal files matching GLOB instead of the default runtime and system journal paths. May be specified multiple times, in which case files will be suitably interleaved. |
-m, --merge |
Show entries interleaved from all available journals, including remote ones. |
--root |
Takes a directory path as an argument. If specified, journalctl will operate on journal directories and catalog file hierarchy underneath the specified directory instead of the root directory. |
These are only the ones mentioned in the LPIC-1 docs. See the man page for all the options.
Forwarding to syslogd
To forward messages to the socket file /run/systemd/journal/syslog, turn on the ForwardToSyslog=yes in /etc/systemd/journald.conf (it should be on by default).
Also, for the Storage= option, have a value other than none.
You can also forward to other locations with the following options:
ForwardToKMsg(kernel log buffer,kmsg),ForwardToConsole(the system console) orForwardToWall(all logged-in users viawall).
The Mail Transfer Agent (MTA), also known as the Message Transfer Agent, is a program running as a system service which sends mail message to local user inboxes as well as transferring mail messages to other user accounts on the network (by default, an MTA will only accept messages to local recipients). An MTA is all that is needed to send and receive mail on a network.
Networked machines that want to send and receive mail will each need to be running an MTA daemon. However, it is more common for machines to use webmail rather than running a local MTA daemon. Note, though, that any remote user account will need proper authentication in order to retrieve the email.
If a user wants to send a message, it will place new message in their outbox location (a filesystem location determined by the MTA), and the MTA will spring into action.
Connections will use SMTP to facilitate the requests, and the remote MTA is often referred to as the SMTP server.
The
MTAwill usually store the messages in themboxformat, which is a single text file containing all email messages in sequence. Mail clients (MUA, or mail user agent) such as Thunderbird, Evolution and KMail are often used to read the email instead of accessing this file directly.
So, how does the local MTA know where to send the email? It will determine the destination by looking at the domain name and querying DNS for its MX record (i.e., its mail exchanger record), which will contain the IP address of the MTA handling email for that particular domain.
Some domains will have more than one MX record, and in those cases the MTA will try to send the mail in order of their priority values. If the recipient’s email address doesn’t have a domain or the domain doesn’t have an MX record, then the node is treated as being on the local network (that is, the name after the at symbol (@) is assumed to be a host name).
$ dig +short benjamintoll.com mx
10 mail.protonmail.ch.
20 mailsec.protonmail.ch.
It’s important to consider security measures when setting up an
MTA. For instance, you don’t want it accessible by everyone on the Internet.This could lead it to be abused as an open relay by nefarious people that are spoofing email addresses, using your
MTAas the facilitator.
MTAs
Traditionally, Linux has used Sendmail as its MTA. Other common ones are Postfix, qmail and Exim. These latter software packages are often used in place of Sendmail as they are easier to use and easier to configure advanced features (which Sendmail may not support), and they can be used as drop-in replacements for Sendmail if they are branded as Sendmail-compatible.
If the MTA is running but not accepting network connections, it will only be able to deliver email messages to local nodes. For Sendmail, some distributions may have a configuration file in /etc/mail/sendmail.mc that can be edited with the network IP address to allow non-local connections. Of course, don’t forget about the security implications of this!
To support remote mail connections, look for a line in the config file like the following:
DAEMON_OPTIONS(`Port=smtp,Addr=127.0.0.1, Name=MTA')dnl
Let’s look at an example that uses Sendmail and SMTP protocol commands to send an email message.
Sending an Email
In a terminal, start the MTA (Sendmail):
$ sudo sendmail
In another, use ncat (nc) to send an email to a user on the system. Since this is the manual way of sending mail, we’ll need to type the SMTP commands ourselves when talking to the SMTP server instead of having an MUA handle those details for us (SMTP protocol commands and email message content are in bold):
$ nc 127.0.0.1 25 220 kilgore-trout.benjamintoll.com ESMTP Postfix (Debian/GNU) HELO 127.0.0.1 250 kilgore-trout.benjamintoll.com MAIL FROM: btoll 250 2.1.0 Ok RCPT TO: btoll 250 2.1.5 Ok DATA 354 End data with. Subject: ello kiddies Hi btoll, you are a true hero. . 250 2.0.0 Ok: queued as C819E364C0E QUIT 221 2.0.0 Bye ^C You have new mail in /var/mail/btoll
Note that I’m sending an email to myself on the same machine, so the
MTAis local. This isn’t always the case, and often you would usencatto establish a connection to a differentMTA, perhaps on another subnet, where the recipient has an account. The localMTAwould be the exchange initiator.
Here is the same example using the Sendmail binary instead of SMTP commands, which is a bit nicer than having to remember the protocol commands yourself:
$ sudo sendmail btoll
From: btoll
To: btoll
Subject: Sender MTA test

Hi btoll, you are a true hero.
.
$ echo $?
0
You have new mail in /var/mail/btoll
$ mail
"/var/mail/btoll": 1 message 1 new
>N   1 btoll@kilgore-trou Thu Apr 27 01:21  12/504   Sender MTA test
? 1
Return-Path: <root@kilgore-trout.benjamintoll.com>
X-Original-To: btoll
Delivered-To: btoll@kilgore-trout.benjamintoll.com
Received: by kilgore-trout.benjamintoll.com (Postfix, from userid 0)
        id F114F364C80; Thu, 27 Apr 2023 01:21:26 -0400 (EDT)
From: btoll@kilgore-trout.benjamintoll.com
To: btoll@kilgore-trout.benjamintoll.com
Subject: Sender MTA test
Message-Id: <20230427052126.F114F364C80@kilgore-trout.benjamintoll.com>
Date: Thu, 27 Apr 2023 01:20:53 -0400 (EDT)

Hi btoll, you are a true hero.
? q
Saved 1 message in /home/btoll/mbox
Held 0 messages in /var/mail/btoll
Again, I’m sending it to myself, because I have no friends. Then, I’m accessing the email through the mail program.
If there was a failure when trying to deliver this message, then the mailq command, executed with elevated privileges, will show all of the undelivered messages.
The
sendmail -bpcommand is equivalent tomailq. Present regardless of theMTAbeing used, it’s an example of how mostMTAs provide backwards-compatibility with these traditional mail administration commands.
As mentioned before, email destination hosts are tried by the MTA in order of their priority values as discovered by doing a DNS query for the MX record(s). If none of the destination hosts are reachable, the message will stay in the local outbox queue to be sent later. If configured to do so, the MTA may check periodically if the message can be sent by trying to reach the destination MTAs. Note that a Sendmail-compatible MTA can force a new attempt by issuing sendmail -q.
Once the mail has been delivered to the destination and is in the user’s inbox queue, the job of the MTA is finished, and it can take a well-deserved break and enjoy a snack.
There may be additional tasks to perform, such as filtering and spam blocking, but these tasks are performed by third-party applications working with the MTA.
Mail Locations
Incoming messages are usually stored in /var/spool/mail/{user} but may be hard linked to /var/mail/{user} by MTAs like Postfix:
$ ls -i /var/spool/mail/btoll /var/mail/btoll
3436880 /var/mail/btoll  3436880 /var/spool/mail/btoll
Note that the inode numbers are the same, so we know that it’s a hard link.
The default location of the outbox queue is /var/spool/mqueue/, but, again, different MTAs will do different things. Postfix, for example, stores its directory structure in /var/spool/postfix/.
MUAs
Mail (or Message) User Agents are programs that take care of communicating with the MTA under the hood. It presents an easy-to-use user interface to manage the email.
By “under the hood”, I mean that the
MUAwill communicate with theMTAusing theSMTPprotocol.
MUAs include Thunderbird and Evolution. Even webmail is a type of MUA. Of course, there are console mail programs like mail (provided by the mailx package) or GNU Mailutils.
The mail command has two modes:
- send mode
- if an email address is provided, it automatically enters send mode
$ mail --subject "World-changing password manager app" \
> kilgore@derp \
> <<<"You need to check out stymie, dude"
- if an email address is provided, it automatically enters send mode
- normal mode
- otherwise, it enters normal (read) mode
The
MTA!
Aliases
By default, email accounts on a Linux system will use the account name. For example, my user name btoll will have an account at btoll@localhost or btoll@kilgore-trout. Privileged users can change this default mapping for system accounts in /etc/aliases.
These aliases are virtual email addresses, where the messages are redirected to existing local mailboxes. After an alias is added or modified in /etc/aliases, it’s necessary to run the newaliases command which updates the MTA’s aliases database.
The
sendmail -biorsendmail -Icommands and switches can also be used to update theMTA’s aliases database.
In addition to redirecting an email to a local mailbox using an alias, it is also possible to have other destinations for the email:
- an external address
- a full path to a file
- the path must start with
/ - messages to this alias will be appended to the file
- the path must start with
- a command to process the message
- must start with the pipe character (
|) - any special characters must be enclosed with double quotes
- example:
subscribe: |subscribe.sh
- if
Sendmailis running in restricted shell mode, the allowed commands should be in/etc/smrsh
- must start with the pipe character (
- an include file
- an alias can have multiple destinations (separated by commas), so it may be more convenient to put them all in one location
- example:
subscribe: :include:/var/local/destinations
Unprivileged users can add aliases in their home directory in the .forward file. Since the aliases only affect their one and only user account (mailbox), only the destination (as described above) is necessary.
Redirection rules are added one per line. The .forward file must be writable only by its owner, and it’s not necessary to run newaliases or any of the previous sendmail commands after updating.
CUPS
The Common UNIX Printing System (CUPS) allows for printing and printer management. Here is a rough outline of the steps to print a document:
- A user submits a file to be printed.
- The
CUPSdaemon,cupsd, then spools the print job. This print job is given a job number byCUPS, along with information about which print queue holds the job as well as the name of the document to print. CUPSutilizes filters that are installed on the system to generate a formatted file that the printer can use.CUPSthen sends the re-formatted file to the printer for printing.
And here are some files that are used for its configuration:
/etc/cups/cupsd.conf- contains the configuration settings for the
CUPSservice itself - same syntax as used for configuring apache
- it controls access to the various print queues, enabling the
CUPSweb interface, the level of logging, etc.
- contains the configuration settings for the
/etc/printcap- the legacy file that was used by the Line Printer Daemon protocol (
LPD) beforeCUPS - specifies a file that is filled with a list of local print queues
CUPSmay still create this file for backwards compatibility- often a symlink to
/run/cups/printcap
- the legacy file that was used by the Line Printer Daemon protocol (
/etc/cups/printers.conf- this file contains each printer that is configured to be used by the
CUPSsystem - each printer is enclused within
<Printer></Printer>stanzas and lists the printers found within/etc/printcap
No modifications to the
/etc/cups/printers.conffile should be made at the command line while theCUPSservice is running.- this file contains each printer that is configured to be used by the
/etc/cups/ppd- a directory that holds the PostScript Printer Description (
PPD) files for the printers that use them - each printer’s operating capabilities will be stored within a
PPDfile - they are plain text files and follow a specific format
- a directory that holds the PostScript Printer Description (
/var/logs/cups/- the directory of the
CUPSlog filesaccess_log- keeps a record of access to the
CUPSweb interface as well as actions taken within it, such as printer management
- keeps a record of access to the
page_log- keeps track of print jobs that have been submitted to the print queues managed by the
CUPSinstallation
- keeps track of print jobs that have been submitted to the print queues managed by the
error_log- contains messages about print jobs that have failed and other errors recorded by the web interface
- the directory of the
There is a web interface at
http://localhost:631forCUPS. Basic authentication is supported.
Most distros have CUPS pre-installed. You can check the status of the service like this:
$ sudo systemctl status cups.service
Adding Printers
You can add a printer using the aforementioned web interface. Also, the legacy command lpadmin can be used to add and configure printers and classes.
In addition, the deprecated command lpinfo can show the available devices or drivers. Usually, though, the lpadmin command is used to let CUPS choose the best driver using the -m option.
For example, here’s adding a printer and having CUPS choose the best PPD file to use:
$ sudo lpadmin -p ENVY-4510 -L "office" -v socket://192.168.150.25 -m everywhere
$
$ lpinfo --make-and-model "HP Envy 4510" -m
hplip:0/ppd/hplip/HP/hp-envy_4510_series-hpijs.ppd HP Envy 4510 Series hpijs, 3.17.10
hplip:1/ppd/hplip/HP/hp-envy_4510_series-hpijs.ppd HP Envy 4510 Series hpijs, 3.17.10
hplip:2/ppd/hplip/HP/hp-envy_4510_series-hpijs.ppd HP Envy 4510 Series hpijs, 3.17.10
drv:///hpcups.crv/hp-envy_4510_series.ppd HP Envy 4510 Series, hpcups 3.17.10
everywhere IPP Everywhere
Future versions of
CUPShave deprecated drivers and will instead focus on usingIPP(Internet Printing Protocol) and standard file formats.IPPcan perform the same tasks that a print driver is used for.
IPP, just like theCUPSweb interface, utilizes network port 631 with theTCPprotocol.
Lastly, set a default printer using the lpoptions command:
$ lpoptions -d ENVY-4510
Managing Printers
Share the printer on the network:
$ sudo lpadmin -p FRONT-DESK -o printer-is-shared=true
Configure a print queue to only accept or deny jobs from specific users:
$ sudo lpadmin -p FRONT-DESK -u allow:carol,frank,grace
$ sudo lpadmin -p FRONT-DESK -u deny:dave
Precede group names with an ampersand (@):
$ sudo lpadmin -p FRONT-DESK -u deny:@sales,@marketing
Error policies can be defined:
abort-jobretry-jobretry-current-jobstop-printer
Here is an example of a print job aborting if an error is detected:
$ sudo lpadmin -p FRONT-DESK -o printer-error-policy=abort-job
Submitting Print Jobs
Use the lpr command to send a print job to a printer’s queue. The following command will send a job to the default printer, as determined by the /etc/cups/printers.conf file:
$ lpr derp.txt
To specify a printer:
$ lpr -P FRONT-DESK derp.txt
Use lpstat to print CUPS status information:
$ lpstat -p -d
printer FRONT-DESK is idle.  enabled since Mon 03 Aug 2020 10:33:07 AM EDT
printer PostScript_oc0303387803 disabled since Sat 07 Mar 2020 08:33:11 PM EST -
	reason unknown
printer ENVY-4510 is idle.  enabled since Fri 31 Jul 2020 10:08:31 AM EDT
system default destination: ENVY-4510
It’s easy to modify how the document should be printed.
landscapetwo-sided-long-edgetwo-sided-short-edgemediacollatepage-rangesfit-to-pageoutputorder
Examples:
$ lpr -P ACCOUNTING-LASERJET -o landscape -o media=A4 -o two-sided-short-edge finance-report.pdf
$ lpr -#7 -o collate=true status-report.pdf
The
lpcommand can also be used. It is mostly compatible withlpr.
Managing Print Jobs
Each job sent to a printer queue gets a job ID, and they can be listed by using the lpq command:
$ lpq -a
lpstatandlp -owill also list printer queues.
Use the lprm command to cancel a job:
$ lprm [job_id]
If a printer fails, you can move the job to another printer queue using the lpmove command (needs escalated privileges):
$ sudo lpmove ACCOUNTING-LASERJET-20 FRONT-DESK
Delete all jobs:
$ lprm -
Alternatively, use the
cancelcommand.A specific print job can be cancelled by its job ID prepended by the printer name:
$ cancel ACCOUNTING-LASERJET-20
Removing Printers
Before removing a printer, it may be helpful to list out all of the printers using the -v switch of the lpstat executable:
$ lpstat -v
device for FRONT-DESK: socket://192.168.150.24
device for ENVY-4510: socket://192.168.150.25
device for PostScript_oc0303387803: ///dev/null
As a privileged user, you can reject the printer and give a reason why using cupsreject:
$ sudo cupsreject -r "Printer to be removed" FRONT-DESK
This is good practice and lets all users know that a printer is no longer accepting new jobs. Then, remove the printer using the the lpadmin binary and the -x switch:
$ sudo lpadmin -x FRONT-DESK
Summary
Well, that was mostly boring as hell.
Continue your journey with the fifth installment in this titillating series, On the LPIC-1 Exam 102: Networking Fundamentals.