This is a riveting series:
- On the LPIC-1 Exam 102: Shells and Shell Scripting
- On the LPIC-1 Exam 102: User Interfaces and Desktops
- On the LPIC-1 Exam 102: Administrative Tasks
- On the LPIC-1 Exam 102: Essential System Services
- On the LPIC-1 Exam 102: Networking Fundamentals
- On the LPIC-1 Exam 102: Security
And, so is this one!
When studying for the Linux Professional Institute LPIC-1 certification, I took a bunch of notes when reading the docs and doing an online course. Note that this is not exhaustive, so do not depend on this article to get you prepared for the exam.
The menu items below are not in any order.
This roughly covers Topic 106: User Interfaces and Desktops.
Caveat emptor.
- Exam Details
- Topic 106: User Interfaces and Desktops
- Summary
- References
Exam Details
- Exam Objectives Version: 5.0
- Exam Code: 102-500
Topic 106: User Interfaces and Desktops
X Window System
The X Window System is a windowing system on Unix machines for bitmap displays. It started in 1984 at MIT as a part of Project Athena.
At its heart, its purpose is to display text and graphics on a screen. They are two-dimensional, and there are extensions through which three dimensional shapes are achieved.
The architecture is client-server, and each client, be it a terminal emulator, web browser or any graphical display, manages its own look and feel, independent of the server.
The protocol has been at version 11 since 1987 (commonly written as X11), and the X.Org Foundation leads its development. X.org Server is its current reference implementation, and the X protocol is the communication mechanism between the client and server.
Essentially, X provides the basic framework for a GUI environment, and each person using a networked terminal can interact with the display using any type of user input device.
The predecessor to
Xwas a windowing system calledW, and it was jointly developed by MIT, IBM and DEC. The software came directly out of the Project Athena project in 1984.The name
Xwas chosen simply because it’s the next letter afterW.
Architecture
To get statistics and information about windows in
X, use thexwininfoutility.
X provides the ability to draw basic two dimensional shapes on a display (three dimensions are supported through extensions). The client and server are often on the same machine, the former being the display manipulated by the user, such as the web browser.
Each client communicates to the server its window location and size on the screen, and the server draws and moves the windows on the display device and interacts with the mouse and keyboard.
Importantly, each client determines what its display looks like, what goes into it and how it’s designed (different toolkits like GTK+ and Qt give displays a distinct look and feel). The server doesn’t determine any of it, only handling the aformentioned tasks of drawing and moving, etc.
Here is a visual image of the X Window system architecture:
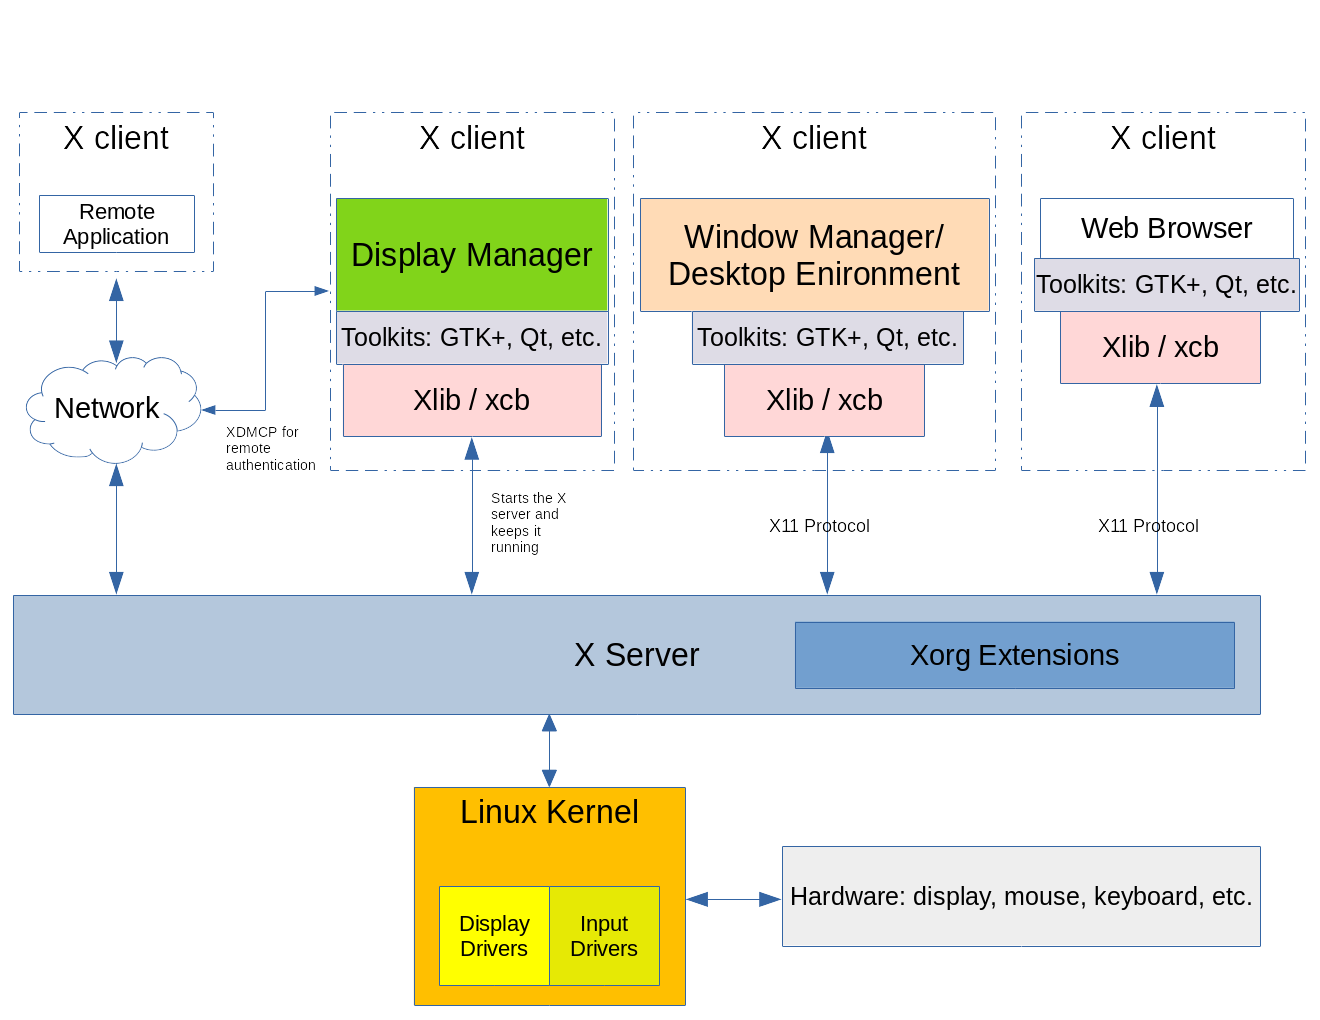
X is network-capable and multiple X clients from different computers on a network can make drawing requests to a single remote X server. This allows a display of the remote graphical application to be forwarded from the remote machine to the local machine running an X server.
In this scenario, the local machine (the one initiating the ssh remote connection) runs an X client application on the remote machine. Here are the following steps (taken from the Remote desktop section on the X Window System Wikipedia page):
- On the local machine, open a terminal window.
- Use the
ssh -Xcommand to connect to the remote machine. - Request a local display/input service.
The remote X client application will then make a connection to the user’s local X server, providing display and input to the user.
The
xhostutility is the server access control program forX, allowing for things such as adding or removing user access to theXserver.
Display Managers
A display manager is a graphical login to a system that is launched after the computer boots. Common display managers are LightDM and GDM, and it is also the component that starts the X server. Indeed, the display manager is also responsible for keeping it up and running.
On my Debian machine, I can find out which display manager I’m using by looking at the contents of /etc/X11/default-display-manager:
$ cat /etc/X11/default-display-manager
/usr/sbin/gdm3
systemd may also have have some information:
$ systemctl status display-manager
● gdm.service - GNOME Display Manager
     Loaded: loaded (/lib/systemd/system/gdm.service; static)
     Active: inactive (dead)
On Red Hat systems, try looking at the contents of
/etc/sysconfig/desktop.
Each instance of a running X server has a display name to identify it. Here is its format:
hostname:displaynumber.screennumber
It will also instruct a graphical application where it should be rendered on which host (if using a remote X connection).
Here are brief descriptions of each composite part:
-
hostname- refers to the name of the system that displays the application
- if missing, then
localhostis assumed
-
displaynumber- references the collection of screens that are in use
- can be a single screen or multiple screens
- each running
Xserver session is given a display number starting at 0 (zero)
-
screennumber- defaults to 0 (zero)
- for instance, will be 0 if there’s only one physical screen or multiple physical screens are configured to work as one logical screen and windows can be freely moved between screens
- for independently configured screens, windows cannot be moved between screens
For example, on my machine the $DISPLAY environment variable looks like the following:
$ printenv DISPLAY
:0
This means that:
- the
Xserver is on the local machine (localhostis assumed) - the current
Xserver session is the first one (0) - since there is only one logical screen in use, the screen number is omitted
If there is more than one screen in use, their names would look like the following (assuming localhost):
:0.0:0.1:0.2
As mentioned above, an application opened on one screen cannot be moved to the other two. The three screens are independent of one another.
To display an application on a specific screen, augment its environment by specifying its DISPLAY name:
$ DISPLAY=:0.1 thunderbird &
Extensions
Since X is modular, many features have been able to be added to it over the years in the form of extensions to the core X11 protocol.
Examples of X extensions:
xorg.conf
On modern Linux distros, there may not be an xorg.conf configuration file, as X11 will configure itself at runtime.
However, you can create a new xorg.conf file:
$ sudo Xorg :1 -configure
The new configuration file will be written to /root under the name xorg.conf.new. To test the server run:
$ sudo X -config /root/xorg.conf.new
Xis symlinked toXorg.
The xorg.conf config file is separated into stanzas in the format of Section SECTION_NAME (terminated by EndSection), where SECTION_NAME refers to a component’s configuration:
$ sudo head -20 /root/xorg.conf.new
Section "ServerLayout"
        Identifier     "X.org Configured"
        Screen      0  "Screen0" 0 0
        Screen      1  "Screen1" RightOf "Screen0"
        InputDevice    "Mouse0" "CorePointer"
        InputDevice    "Keyboard0" "CoreKeyboard"
EndSection

Section "Files"
        ModulePath   "/usr/lib/xorg/modules"
        FontPath     "/usr/share/fonts/X11/misc"
        FontPath     "/usr/share/fonts/X11/cyrillic"
        FontPath     "/usr/share/fonts/X11/100dpi/:unscaled"
        FontPath     "/usr/share/fonts/X11/75dpi/:unscaled"
        FontPath     "/usr/share/fonts/X11/Type1"
        FontPath     "/usr/share/fonts/X11/100dpi"
        FontPath     "/usr/share/fonts/X11/75dpi"
        FontPath     "built-ins"
EndSection
Here are all the sections in the configuration created on my Debian bullseye machine:
$ sudo sed -n '/^Section/p' /root/xorg.conf.new
Section "ServerLayout"
Section "Files"
Section "Module"
Section "InputDevice"
Section "InputDevice"
Section "Monitor"
Section "Monitor"
Section "Device"
Section "Device"
Section "Screen"
Section "Screen"
Here are some of the common stanzas, accompanied by a brief description of each:
-
InputDevice- used to configure a specific model of keyboard or mouse
-
InputClass-
unlike the other stanzas, this is typically found in a separate file in the
/etc/X11/xorg.conf.d/directory -
the stanza configures a class of hardware device inputs such as a keyboard, mouse, trackpad, etc., rather than a specific piece of hardware
-
for example, you could persistently disable an input source by creating
/etc/X11/xorg.conf.d/30-disable-device.conf:Section "InputClass" Identifier "disable-device" Driver "driver_name" MatchProduct "device_name" Option "Ignore" "True" EndSectiondeviceis an arbitrary namedriver_nameis the name of the input driver (e.g.,libinput)device_nameis what is actually used to match the proper device
Here’s an example for a particular keyboard in a file that could be named
/etc/X11/xorg.conf.d/00-keyboard.conf:Section "InputClass" Identifier "system-keyboard" MatchIsKeyboard "on" Option "XkbLayout" "us" Option "XkbModel" "pc105" EndSectionThe files associated with keyboard layouts can be found within
/usr/share/X11/xkb/.You can also modify an input at runtime using the
setxkbmapcommand, but this of course will only last the session. This command makes use of theXkeyboard extension (XKB), an example of a feature ofXthat was enabled by its modular design allowing for extensions.Here’s an example of a runtime command that I’ve often used in my
bashscripts that will change the function of theCAPS LOCKkey to that of theCTRLkey:$ setxkbmap -option caps:ctrl_modifierYou can also use
systemd’slocalectlcommand to list information pertaining to keyboards (look at/usr/share/X11/xkb/rules/base.lst), as well as creating and modifying config files so you don’t have to do it by hand.$ localectl list-x11-keymap-models $ localectl list-x11-keymap-layouts $ localectl list-x11-keymap-variants [layout] $ localectl list-x11-keymap-optionsThe
--no-convertoption can be used to preventlocalectlfrom modifying the host’s console keymap.
-
-
Monitor- this section describes the physical monitor in use and where it’s connected
-
Device- describes the physical video card in use
- will also contain the kernel module for the video card driver and its physical location on the motherboard
-
Screen- this section ties the
MonitorandDevicesections together
- this section ties the
-
ServerLayout- note that I don’t have this section in my generated config file on Debian
bullseye - this section groups all of the sections such as mouse, keyboard and screens into one
XWindow System interface
- note that I don’t have this section in my generated config file on Debian
According to the
LPIC-1docs:Not all sections may be found within a configuration file. In instances where a section is missing, default values are provided by the running
Xserver instance instead.User-specified configuration files also reside in
/etc/X11/xorg.conf.d/. Configuration files provided by the distribution are located in/usr/share/X11/xorg.conf.d/. The configuration files located within/etc/X11/xorg.conf.d/are parsed prior to the/etc/X11/xorg.conffile, if it exists on the system.
Use xdpyinfo to print information about a running X server.
$ xdpyinfo | head
name of display:    :0
version number:    11.0
vendor string:    The X.Org Foundation
vendor release number:    12011000
X.Org version: 1.20.11
maximum request size:  16777212 bytes
motion buffer size:  256
bitmap unit, bit order, padding:    32, LSBFirst, 32
image byte order:    LSBFirst
number of supported pixmap formats:    7
Note that that the name of the display is the same value as that contained in the DISPLAY environment variable. Also, further down (not shown here) it will display the X extensions in use.
$ loginctl show-session $XDG_SESSION_ID | head
Id=1
User=1000
Name=btoll
Timestamp=Thu 2023-01-26 02:18:18 EST
TimestampMonotonic=41904485
VTNr=1
Seat=seat0
TTY=tty1
Remote=no
Service=login
The
loginctlcommand may be used to introspect and control the state of thesystemdlogin manager.
Wayland
Wayland is a newer display protocol intended to replace the X Window System. It is meant to be lighter on system resources and have a smaller installation footprint than X. The project began in 2010.
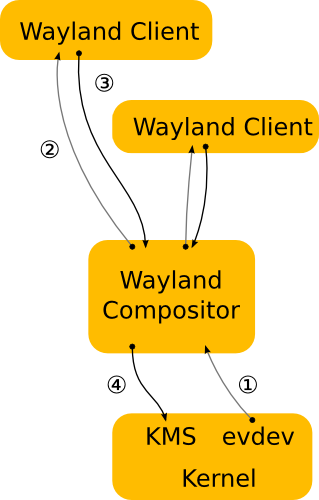
Unlike X, Wayland doesn’t not have a client-server model, and there is no server instance that runs between the client and the kernel. Instead, a client window works with its own code or that of a toolkit (such as GTK+ or Qt) to provide the rendering.
In order to do the rendering, a request is made to the Linux kernel via the Wayland protocol. The kernel forwards the request via the Wayland protocol to the Wayland compositor, which handles device input, window management and composition. The compositor is the part of the system that combines the rendered elements into visual output on the screen.
If the system uses Wayland, the WAYLAND_DISPLAY environment variable will not be empty:
$ echo $WAYLAND_DISPLAY
My system uses
X, so theWAYLAND_DISPLAYvariable isn’t set.
X vs. Wayland Architecture
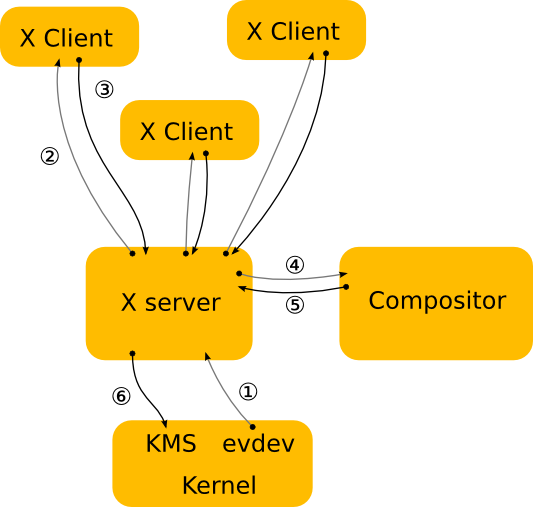
Let’s first take another look at the X Window System architecture:
And now at the Wayland architecture:
The recent versions of the GTK+ 3 and Qt 5 toolkits support both X and Wayland, but not all standalone applications do. In this cases, the application can run in XWayland, which was mainlined into X.Org Server version 1.16. The XWayland system is a separate X server that runs within a Wayland client and thus renders a client window’s contents within a standalone X server instance.
Desktop Environments
Popular desktop environments:
The window manager is probably the most important component of a desktop environment. It controls window placement, the decoration and appearance of windows in a windowing system and switching between open windows, et al.
There are different kinds of window managers, such as compositing, stacking and tiling.
A desktop environment has a common theme (look and feel) that is generally determined by and influenced by the widget toolkit that was used to develop it. For example, the application launcher, taskbar and window decoration will all have a similar look and feel, as they relied on a particular widget toolkit to assemble their visual interfaces.
Widgets are informative or interactive visual elements.
Regardless of the desktop environment chosen, they will usually all provide a common set of tools and accessories that fall into three categories:
-
system related applications
- terminal emulator, file manager, package installation manager, system configuration tools, etc.
-
communications and the Internet
- contacts manager, email client, web browser, etc.
-
office applications
- calendar, calculator, text editor, spreadsheet software, etc.
Desktop Interoperability
A large body of specifications for desktop interoperability is maintained by the freedesktop.org organization, which hosts the development of free and open source software. They are focused on interoperability and shared technology for open-source graphical and desktop systems.
Although adoption of the full specification isn’t mandatory, many desktop environments implement many of them. Here are some:
-
directory locations
- where the personal settings and other user-specific files are located
-
desktop entries
- command-line applications can run in the desktop environment through any terminal emulator, but it would be too confusing to make all of them available in the application launcher
- desktop entries are text files ending with
.desktopwhich are used by the desktop environment to gather information about the available desktop applications and how to use them
-
application autostart
- desktop entries indicating the application that should start automatically after the user has logged in
-
drag and drop
- how applications should handle drag and drop events
-
trash can
- the common location of files deleted by the file manager, as well as the methods to store and remove files from there
-
icon themes
- the common format for interchangeable icon libraries
-
identifying file types
- rules for identifying the default applications associated to particular file types and protocols
-
exchanging data between applications and desktops
The specifications are often called
XDGspecifications, as an acronym for theCross-Desktop Group.Users may recognize the acronym, as many environment variables are prefaced with it. Here are some on my system:
$ printenv | ag xdg
XDG_SEAT=seat0
XDG_SESSION_TYPE=tty
XDG_SESSION_CLASS=user
XDG_VTNR=1
XDG_SESSION_ID=1
XDG_RUNTIME_DIR=/run/user/1000
Remote Desktops
X Forwarding
Remote desktop sessions are supported natively by X by the X Display Manager Control Protocol (XDMCP). Note that there are security concerns, as well as it is bandwidth-intensive. Further, X needs to be installed on both ends of the connection.
Virtual Network Computing
Virtual Network Computing (VNC) is another option. It is a platform-independent tool to view and control remote systems and uses the Remote Frame Buffer (RFB) protocol. This protocol works at the framebuffer level and is applicable to all windowing systems and applications, including Microsoft Windows, macOS and the X Window System.
It transmits the keyboard and mouse input from one computer to another, relaying the graphical screen updates over the network. So, the local desktop sends keyboard input and mouse coordinates, for example, and the remote desktop sends back any screen updates to be displayed locally.
Many VNC servers can be run on the local machine, with each one by convention getting its own TCP port starting at 5900 and incrementing from there. And unlike remote forwarding with X, the VNC server doesn’t need any special privileges to run, so any user can log into the remote system and start their own VNC server (and then the local VNC client application can be started and used to access the remote desktop).
The $HOME/.vnc/xstartup script is executed by the VNC server on initiation, and it can be used to define which desktop environment will be made available to a VNC client.
Security is an issue with VNC, as it doesn’t provide any encryption or authentication natively, so ssh or VPN should be used to secure the connection.
Remote Desktop Protocol
There’s also the proprietary Remote Desktop Protocol (RDP) which is only used to access the Windows windowing system. By convention, it uses TCP 3389 port. However, open-source client applications can run on Linux and are licensed under the GNU General Public license (GPL), that is, there are no legal restrictions on its use.
SPICE
Lastly, Simple Protocol for Independent Computing Environments (SPICE) comprises a suite of tools aimed at accessing the desktop environment of virtualised systems, either in the local machine or in a remote location.
There are specific client commands to connect to each one of these remote desktop protocols, but the
Remminaremote desktop client provides an integrated graphical interface that facilitates the connection process, optionally storing the connection settings for later use.Remminahas plugins for each individual protocol and there are plugins forXDMCP,VNC,RDPandSPICE.The choice of the right tool depends on the operating systems involved, the quality of the network connection and what features of the remote desktop environment should be available.
Accessibility
Universal Access Modules
Most of the Linux distributions have similar accessibility features, and they can be customized with a configuration module found in the settings manager that comes with the desktop environment.
For instance, in GNOME, they are available through the accessiblity settings module Universal Access. KDE and others have them in different places and through other names, but they all provide a core set of functionality that help people with all kinds of disabillities (for example, replace the audial bell with a visual one).
Keyboard
The following features address accessibility issues that help with mobility difficulties with key combinations, key auto repeat rate and unintended key presses, which can all be significant obstacles for users with reduced hand mobility.
The slow keys, sticky keys, bounce keys and mouse keys are accessibility features provided by
AccessX, a resource within theXkeyboard extension of theXWindow System.AccessXsettings can also be modified from the command line, with thexkbsetcommand.In addition, things like keyboard rate can be set with
kbdrate.
Sticky Keys
This feature allows users to type key combinations one key at a time. For example, when needing to type Ctrl-C, the user would not need to first hold down the Control key while pressing C.
The Control key instead can be pressed and released, followed by a separate pressing of the C key.
KDEmay call thisModifier Keys, instead.
In addition, KDE offers the Locking Keys accessibility option, where the user can toggle the Alt, Ctrl and Shift keys, similar to the Caps Lock behavior.
Sticky keys and slow keys can be turned on and off (toggled) by enabling
Activation Gestures, which are toggled by pressing theShiftkey five consecutive times (to toggle sticky keys) and holding down theShiftkey for eight consecutive seconds (toggling slow keys).
Bounce Keys
To assist users that may be afflicted with hand tremors, the Bounce Keys feature will inhibit unintended key presses by placing a delay between the presses, so that a new key press is only seen as “legal” after a certain amount of time has passed since the last key press.
In GNOME, the feature only pertains to the same key, but KDE broadens the feature to pertain to any other key as well (in that desktop environment, it is referred to as Keyboard Filters).
Slow Keys
The slow keys feature also helps to avoid accidental key strokes. When enabled, slow keys will require the user to hold down the key for a specified length of time before it is accepted.
Sticky keys and slow keys can be turned on and off (toggled) by enabling
Activation Gestures, which are toggled by pressing theShiftkey five consecutive times (to toggle sticky keys) and holding down the `Shift key for eight consecutive seconds (toggling slow keys).
Mouse Keys
Users who find it more comfortable to use keyboard over the mouse or touchpad can resort to keyboard shortcuts to get around in the desktop environment. Furthermore, a feature called mouse keys allows the user to control the mouse pointer itself with the numerical keypad, which is present in full-sized desktop keyboards and in larger laptops.
The numerical keypad is arranged into a square grid, so each number corresponds to a direction: 2 moves the cursor downwards, 4 moves the cursor to the left, 7 moves do cursor north-west, etc. By default, number 5 corresponds to the left mouse click.
Speed and acceleration can also be customized.
Mouse
Screen Keyboard
The onscreen keyboard will appear every time the cursor is in a text field if Screen Keyboard in GNOME’s Universal Access is enabled. This will allow someone who is uncomfortable using the keyboard to enter text with the mouse or trackpad or touchscreen (much like the virtual keyboard on a smartphone).
If the accessibility feature isn’t available, try installing the onboard package.
Mouse Preferences
Further, if clicking and dragging the mouse causes pain or discomfort, the Mouse Preferences feature may be able to help. This will allow for things such as increasing the time between mouse-clicks to generate a double-click if the default interval time between clicks is too quick and therefore not feasible.
There is the Click Assist feature in GNOME which, when enabled, allow for the mouse clicks to be simulated if the user is unable to physically click the mouse buttons.
For example, mouse clicks, both left and right, can be simulated.
The
KDEapplicationKMouseTooloffers the same functionality.
Visual Impairments
For those with impaired vision, GNOME’s Seeing section of the Universal Access settings can help with:
- high contrast
- will make windows and buttons easier to see by drawing them in sharper colors
- large text
- will enlarge the standard screen font size
- cursor size
- allows to choose a bigger mouse cursor, making it easier to locate on the screen
There’s also a Zoom feature, where options like magnification ratio, position of the magnifier and color adjustments can be customized (KDE has the KMagnifier program).
Screen Readers
Orca is a popular screen reader for Linux. Orca also works with refreshable braille displays, special devices that display braille characters by raising small pins that can be felt with the fingertips, although, not all desktop applications are fully adapted for screen readers.
Summary
Continue your journey with the third installment in this titillating series, On the LPIC-1 Exam 102: Administrative Tasks.